Learning how to print with chrome browser for windows gives you the opportunity to produce hard copy versions of information and interesting articles in a jiffy. It is always handy when you stumble upon an article or interesting image that’s on the web that you’d like to keep or study further. Printing the page content and its associated photos and images off the web page itself with Chrome browser can be just as easy as printing from a word document that you have save on your PC. And just like when you print a page from your PC, print with Chrome also gives you some control on how exactly you’d like to print it including the use of colour, background and layout. Just follow the instructions below and you’ll be printing in a jiffy:
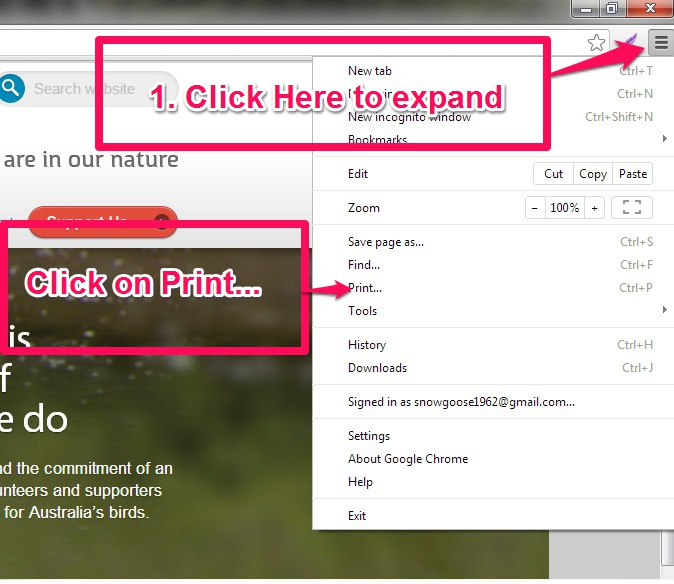
Pic 1: The Customize and control Google Chrome menu screen
Step 1: Expand dialog box by clicking on the above 3 lined button
Step 2: Click on Print…
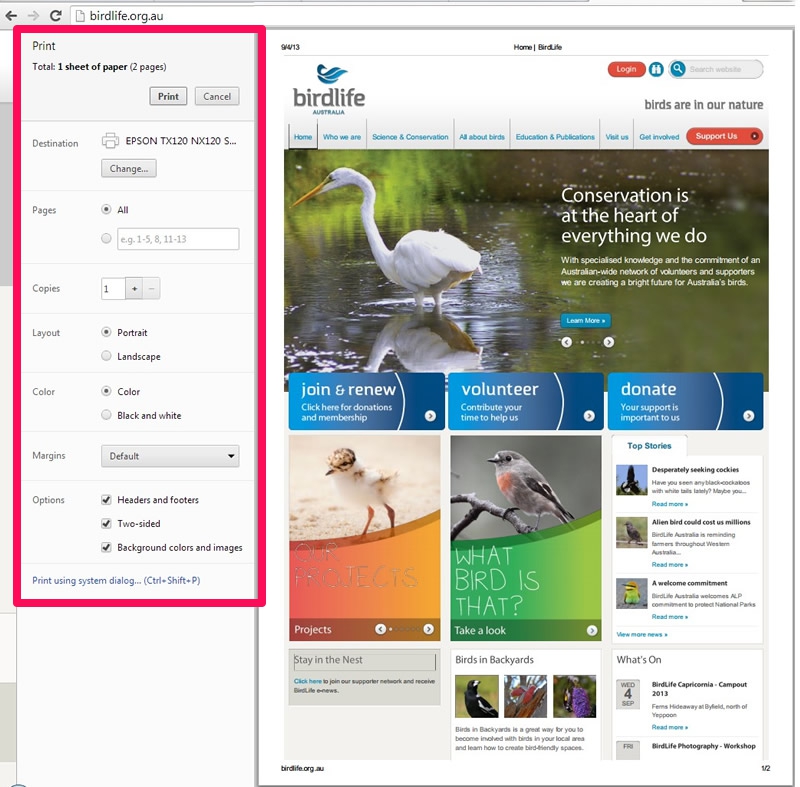
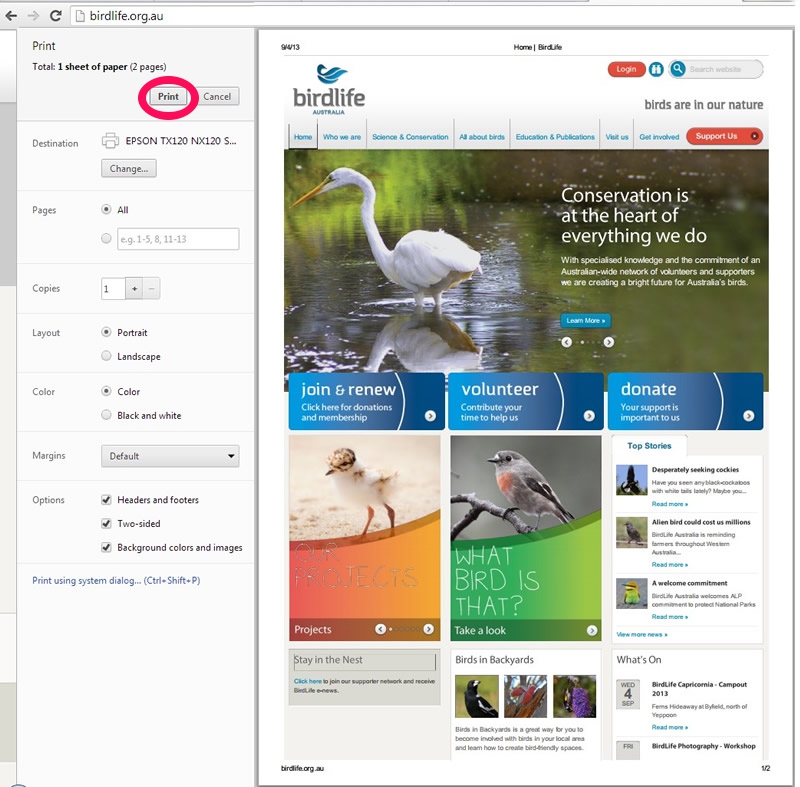
Pic 2: The Print dialog options box alongside the web page preview screen.
Step 3: Read the definitions of the dialog box below:
a) Destination: This is the drop down menu option which allows you to either print a hard copy or save it to your PC for printing or viewing later. In our example the destination is an Epson TX120 printer. So in this configuration, we are telling Chrome browser we wish to send this WEB page to a printer. If were to press on the “Print” button above it, the page would be sent to the printer to be printed. If the “change” button is selected, you will be presented with windows dialog box that would show ALL the hard copy printers available along with other destination options that are available to save the page as a PDF or as a GOOGLE DOC or in another other electronic format depending on what software you have running on your PC.
b) Pages: This is where you can tell Chrome what actual WEB page number you wish. If you use your mouse to scroll down the page displayed you’ll quickly see how many pages there actually are in this WEB content. in our case there are a total of two pages. The default setting for this is ALL, but if what you want, is just on the first page then you could simply change this here by by clicking on the dot next to the window where you can type in the page numbers you want. In our case here we have elected to go with All, but you could easily change this to print only page 1 by typing in 1 into the blank window space. Or you could type in the number 2 so you only get page 2. Other times you may want say pages 5-15, so that’s what you would type into this box.
c) Copies: In this section you can specify the number of total copies of sheets that you wish to print. Unlike the pages section above it,with this option you’re telling Chrome how many total sheets of each page you wish printed. So you may have selected the default setting of ALL in the pages section which in this case is 2. Here its the amount of those lots that you want. So you maybe having a meeting with four others, so you’d want to print four copies, one for yourself and three for others. So you would actually print a total of 8 sheets (2 pages x 4 copies) with this setting.
d) Layout: Here Chrome gives you the option to decide how you wish the layout orientation to be printed. Portrait is usually the default choice and as such it will print the WEB content taller than wider while in the Landscape option, the output wider rather than tall. Go ahead and play with this setting as the image will change position on the screen and show you how such will look once printed. If say you changed this page from portrait to landscape you will end up with a total of 4 pages needing to be printed to get ALL the content. Try it and then scroll down on the page to preview.
e) Color: Here you can tell Chrome whether to print in full colour or just in black and white. Go ahead and change the preference around and you’ll see the image change to represent what it will look like once printed or saved. Naturally if you only have a black and white printer, the printed output will only ever be monotone irrespective of where this option is set. Also even if you have a full colour printer, you may prefer to save your ink costs and print in black and white. Colour ink costs about three times more than standard black pigment, so if colour is not as important as the text information you are needing, do yourself a favour and switch over to the Black and White option.
f) Margins: This drop-down gives you several options so you can alter the margins or the blank area around the WEB page before printing or saving. The Default setting is usually about a 12 – 13 mm border, and if you can see this by flicking between the default setting and the other drop down options called None, Minimum and Custom.
With the None option selected, that’s exactly what you get, no blank border margin whatsoever. Now a word of warning here, although what you see on the screen is what is being sent to the printer, if the printer does not have and edge-to-edge printing feature, then its still still likely your printed result will have a small margin. Some printers require such to handle the paper throughout the transport section.
With the Minimum option selected you get Chrome’s best guess so you can print as close to the edge of the WEB page without losing content. Again as with above if the the printer does not have edge-to-edge printing feature, then you may still lose some content and have a larger margin than shown on the screen. its unlikely that you’ll lose any content, as most printers would print within these parameters, but you can never be completely sure about every printer in the market place.
With the Custom option selected, you get to use your mouse and cursor to stretch the border out to the edge for a smaller margin or inwards towards the centre of the page to make such bigger. And you can do this for every side of the page independently. This is handy for making a border blank area bigger on one side to accommodate punch holes for collating of documents in manila and lever arch type folders.
f) Options: This drop-down gives you three other tick-box preferential printing format type options:
Headers and Footers: This selection as shown below, gives you the option to remove the text that resides in the very top and bottom of the web pages. Headers and footers are little bits of organising text that display identifiers like the date created, the actual title of the page, page numbers and the author. As such, only the person wishing to print can know whether such information is pertinent to their needs or not and so with this option it can be turned on or off.
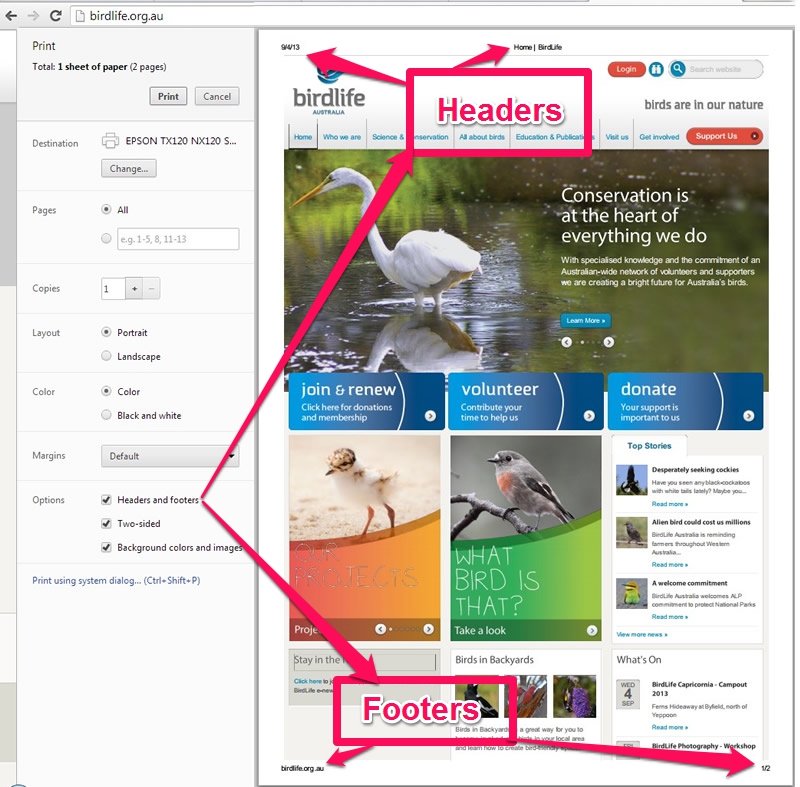
Pic 3: Location of the Headers and Footers.
f) Options: This drop-down gives you three other tick-box preferential printing format type options:
Two-Sided: When this option is selected the WEB page content is formatted to be sent to the printer so that it will print on both sides if the copy paper. So, if were to keep this selection with the current printer we have, the printer would firstly print out page 1 and then ask you to turn the page over and re-insert into the paper tray so it could then print page 2 content onto to the backside. Some printers will require this to be done manually as is the case with this printer, others that have an automatic duplex unit can do it all automatically in one go. The vast majority of desktop printers fall into the first category, while mid to higher volume stand-alone machines fall into the latter. Naturally if you are able to do a two-sided print, then you’d also save 50% on your paper bill.
Background color and images: When this option is selected, the WEB page content will print all colours and images you can see on the page. Try just switching this option off and you’ll immediately see with a web page like we have here as below, that it has quite a dramatic effect to what will be eventually printed. Now the decision whether to select this option is again down to the WEB page content itself and how much the viewer needs to include or not include colour and images. On this example its unlikely we’d turn this setting off, but on another pages that are more textual, turning such off could be a terrific way of conserving ink and increasing productivity through increased print speeds.
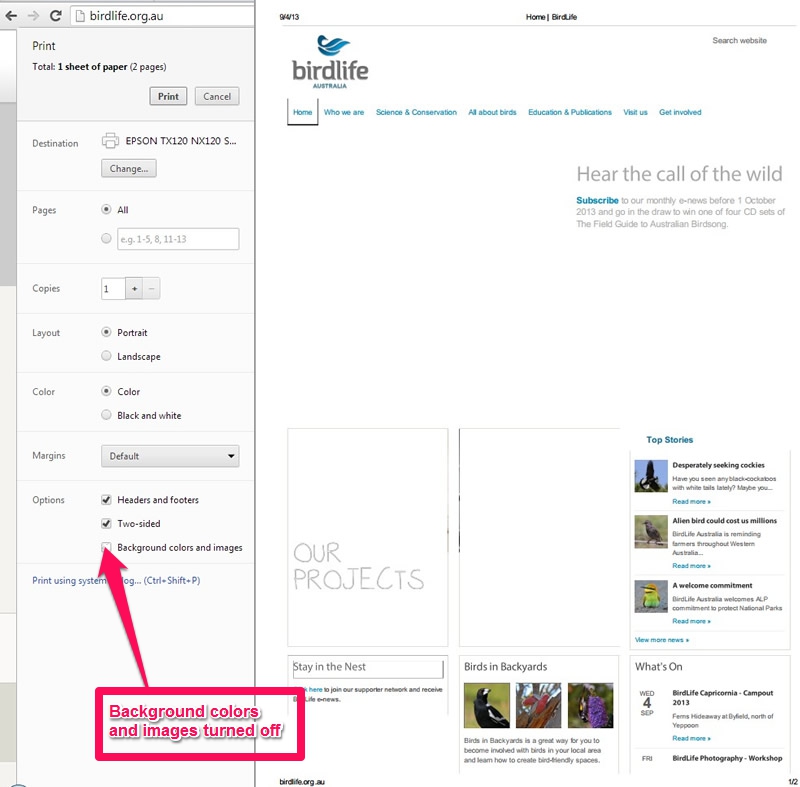
Pic 4 : Background colors and images turned off
So as you can see there’s quite a lot you can do to ensure you get the WEB page you want printed just right and they way you like. If you’re now happy with all the settings, go ahead and press the Print button as below and enjoy!
Please don’t forget to also check out our website store at inkjetwholesale.com.au below by clicking on the image where you’ll find super low prices on printer cartridges that would be siuitable for when you print with Chrome browser
Leave a Reply